Thursday 24 November 2011

Update Of Project

Here is the Initial Gantt Chart which I created at the beginning of the group project:


Due to issues within the module, we applied for an extension until the 21st of December which has since been granted. This means that we can update the Gantt Chart to accomodate this extra time so that we can use it wisely in order to achieve our full potential. Although we were not behind in this section of the module, it has meant that some of the areas we would have either pushed to have completed or had to rework to save time can now be accomplished, hopefully allowing us to achieve a higher grade. The main part of the project which has been affected is the amount of time allocated for the animations and write up. This has been extended by two weeks as this will be ample opportunity to express our animation techniques, research new techniques and tie up any loose ends.

The image below shows the new and updated Gantt Chart:


Model of the Silhouette

In order to show how the Guildhall will be used after the renovations have been taken place, we are going to implement silhouettes to move around the guild hall and to interact with some of the other models. In order to increase my knowledge base, I asked my tutor how to showcase more of my modelling and animation techniques. I used the biped tool instead of the bone tool because it produces better results in the final render. 

The first thing I did was create and TurboSmooth the mesh of a human. The next step was to create a biped that was approximately the same size as the mesh I had created (see image below):


I moved the biped into the centre of the mesh and I increased the size of the bones so that the skeleton fills up the majority of the mesh, giving the most realistic human movement. It does not matter if the biped extends outside the mesh slightly because in the final render, the biped will not be visible. It is merely just to recreate human movement. In order to make the process easier, I made the mesh see-through and froze it into position. That way, the mesh cannot be selected. The image below shows the biped correctly positioned inside the mesh: 


A skin had to be enveloped around the biped and mesh so that the two worked together as one object. Now, when the mesh moves, the biped moves too, creating realistic movements. I applied a black finish to the silhouette and it is now ready to be animated and utilised in the Guildhall animation.


Merging into the Guildhall Main Building file issues

When the biped was merged into the main building .max file, it was far too large and needed to be scaled down. Once a biped has been connected to a mesh, it cannot be simply resized like other objects. Therefore, it had to be scaled down. The image below shows how tall the biped would have to be in order to look more human sized. 

However, after I had entered the biped and mesh properties and scaled it, parts of the biped did not function anymore, rendering the model useless. Due to time constraints, I did not have time to create a new mesh so I just used a simple biped with a bone texture to make them look like skeletons:


-------------------------------------------------------------------------------------------------------------------
References


Filter Forge
2011
Bone texture for biped
Available online at: http://www.filterforge.com/filters/414.html
Last Accessed: 19/12/2011

YouTube
2011
YouTube video to show biped rigging and how to fit a biped inside a rigid mesh
Available online at: http://www.youtube.com/watch?v=si4N6IdlJq8
Last Updated: 19/02/2008
Last Accessed: 19/12/2011

Script To Go With Storyboards


Hello everyone and welcome to the Finchingfield Guildhall short renovation clip. We hope to demonstrate to you how the renovations have been implemented and how the Guildhall will now be used in order to entertain and educate people young and old on the only secular building available to the public.

Over many seasons, the building work has finally been completed, so let’s take a look inside!
Here we have the entrance to the guildhall and the shop. Firstly, you can see that we have easily accessible toilets which have been positioned near the entrance/exit for practicality. Right, into the shop. The shop is used by the whole community, including school children not just from the local areas but from other boroughs as well. We have stocked lots of inexpensive merchandise such as pencils, rubbers and notepads with the Guildhall logo on them to remind the purchasers of their visit to this historic building. The shop also stocks pieces of work from famous novelists such as Dodie Smith, the mastermind behind “101 Dalmatians” and Norman Lewis who wrote “Naples 44”. A watercolour collection by Arthur Legge will also be available in the shop too.

Now we are moving from the shop to the Museum area. Arthur Legge’s daughter, Phyllis, designed a map of Finchingfield and the original was given to the Guildhall. This has been printed on the modern lino which covers the floor in the temporary exhibition area of the Museum. This area joins the shop to the Museum and the space will be used in the future so that local groups and societies can give educational talks and displays to the public.  

In the main museum area, the various items will be displayed in a series of glass tables with interactive touch-screen technology. This will promote learning by displaying the objects in their best possible light and help explain the history behind this ancient building. The technology used in the glass tables is inspired by the Darwin Centre in the Natural History Museum and the aim of using this technology is to make it easier to change the content of the displays more frequently, therefore making the museum a fun, family-friendly, interesting place to visit and learn from. There are also speakers situated throughout the museum area which will play recordings about the history of Finchingfield, particularly about what the village used to be like when there was a more agricultural-based economy. This would be interesting for the older generation so they can reminisce on the “good old days” and for the younger generation to gain an idea on what life was like before they were even thought of!

Moving on to the library, there is a massive stock containing a variety of different books which will interest anyone who visits. The idea is to create a cosy room, with fireplaces to give a warm and welcoming atmosphere and sofas in order to encourage parents and children to read together in a quiet environment. Also in the library, there is a photocopier as there is not one available locally and it has been requested and greatly welcomed by the village occupants and computers with fast broadband access.

That’s it for the ground floor, moving up onto the first floor.

Here we have more toilets and baby changing facilities to meet the needs of visitors.

Now, in the guild room, it has been restored to the original Guildhall layout and it can be utilised in many different ways and for various different uses. When the building was new, around 1470AD, it was used by the Guild of the Holy Trinity for religious purposes and as a school. The idea is to continue using this building in a multitude of different ways so that it can not only meet the needs of the Finchingfield community, but also the needs of other boroughs and nearby villages as well so they too can benefit from this unique building and its histories.

Right, time for the kitchen. The kitchen is where all meals and drinks are carefully prepared for consumption by the visitors of the Guildhall. Prices are very reasonable and money will be used to help improve the Guildhall even further.

Well that’s the new Guildhall! We hope you enjoyed our renovation clip!  

Monday 21 November 2011

Storyboards For Animating The Guildhall

 These are the storyboards which the group will follow in order to animate the Guildhall.


Firstly, the clip starts showing the "old" Guildhall building before it has been renovated. It will be shown in the Summer so it makes it easier for the person looking at the video to see the detail in the exterior. There will be sounds in the background to indicate that it is Summer, for example birds singing.

Depending on the amount of time we will have, the original idea was to have a clock appear in the middle of the screen showing the seasons. The background scenery will change from Summer to Autumn (Orange sky, orange/brown trees and leaves on the floor) and then to Winter, where a slice modifier will be applied and the new building will be revealed. The reason why we felt that the season changing was important was because not only does it symbolise that the renovation works are being taken place, but it also gives us an excuse to show off other animation techniques. For example, we have created fireplaces with working flames and smoke. However, these will not be lit during the Summer periods. Also, we felt that the Guildhall could be used more in the Winter months as it is a warm place for the community to visit and explore. We are hoping to create a snow effect too and the lights will be illuminated inside the building to give a welcoming feeling.

A silhouette will be walking down the path and as it approches the doorway, the camera pans round to focus on it. The video will be based on a human eye's account of the renovations that have taken place.

The next couple of drawings show the silhouette's movement throughout the building. It may or may not be used in the final clip. It really depends on the effect that we are tryiong to create. As a minimum, it is a guide to us as developers to plan where the path will be set for the silhouette.

4a through to 4h shows how each of the components can be animated in order to show how the Guildhall works and how the public will be able to interact with it. Due to time contstraints, we may only be able to use the same silhouette feature. In an ideal world, we would have created individual people models and used them instead to show off some of our other techniques. However, our main focus is getting the building itself finished on time.

At the end of the tour, the silhouette will approack the exit and a "Fade To Black" screen transition will be applied. Scrolling credits will complete the clip, along with our group SID numbers and thanks to the Guildhall society for letting us tour the building and gain valuable firsthand experiences. There will be a voice over throughout to explain what each part of the Guildhall does and how it will be utilised.

We aim to use Windows Movie Maker to add transitions and add the voice over. The voice over may have to be edited using software such as Audacity to ensure that it fits in with the clip. The aim is to get the clip to last no longer than 5 minutes because it will simply take too long to finish rendering. 

Script follows this blog post.

Other Components I have Made

Church:

The church was created to go in the background of the render because at one point in the animation, the camera will be positioned out of one of the windows across the street. We felt this would be a nice touch and it would also prove that the windows that I have created work how they are supposed to (so you can see out of them!) 

The first image shows the church in its most basic form. It has been created out of various primitive box shapes, cylinders and pyramids. 


Each of the individual parts then has to be recoloured to fit in with the actual building: 

Taken from my camera - 30/09/2011
Since there were no suitable images on the Internet or that were taken on our field trip to Finchingfield, it meant that I could not use the UVW Map Tool like I had anticipated. Therefore, I had to find all the appropriate materials online. 

The image below shows the finished result pre-render. I am quite happy with how it turned out considering I had to change plans. The stone material had a Bump modifier added to it to make the stones stand out even more from their background.


The image below shows the church from the window in the Guildhall.


Museum: 

Interactive Display Cases

One of the key rooms in the Guildhall is the Museum. It will hold artifacts which are invaluable to the guildhall. Therefore, they will need to be displayed appropriately. After contacting a member of the Finchingfield Guildhall committee, we discovered that they intend to use touch-screen technology inspired by the Darwin Centre in the Natural History Museum. The image below shows the technology used in the Darwin Centre:

Image taken from: http://www.telegraph.co.uk/travel/picturegalleries/6168481/Natural-History-Museums-Darwin-Centre-Sneak-peek.html?image=4

As you can see, it features glass boxes which contain the artifacts on the wall with interactive touch-screens which provide the vistors with futher information. 

So when it came to creating a display case , it was vital to incorperate:
  • The glass boxes containing the artifacts.
  • Interactive touch screens with artifact information.
  • Lighting effects inside the display case to show artifacts to their best possible effect.
To create the main structure of the display case, I used box primitive shapes. I then used raytrace materials, which I have never used before, in order to create a realistic glass effect and applied it to the outside of the display case. This meant that when any items were stored inside, they would be reflected and refracted according to the light in the environment.

The image below shows the basic structure:


Spheres which also have a raytrace material added and have self illumination selected will act as mini lights in the display case which will not overpower the natural lighting in the environment. A "touch-screen" device has then also been added to the case. The image below shows an example of this:


The image below shows the finished result:


Artifacts
This is just an example of the kinds of artifacts included in the interactive display cases.


Toilets: 

Toilet Roll

The toilet roll and holder was constructed out of primitive shapes. A metal effect has been placed on the holder made out of cynlinders and alligned using the rotate and move tools. A tube was used for the actual roll and a small plane was used as a finishing touch. The purpose of this object was to make the toilets look more realistic. 


Main Guildhall Building:

Windows

When the windows were created, a new skill was obtained. The outside of the windows was made of a wood texture which was then applied only around the edges. Then, I laid a plane shape over the top and modified the material. This time, I used raytrace materials, the same material used for the glass in the display cases and the light bulbs (see below). This allowed me to make the glass transparent and to add a slight reflection and reflaction property, making it act in a similar way to real glass does.

The image below shows the final result after it has been rendered: 


The windows will be used throughout the Guildhall building, therefore are a vital object in the creation of the Guildhall model.

Lighting

Lighting is a major part of the Guildhall because without it, we would not be able to see all of the contents in all their glory! Firstly, I created the lamp shade by creating a base outline in Adobe Illustrator:

It was then imported into 3D Studio Max. I had to ensure that the pivot point was in the correct place because otherwise, when the Lathe Tool was used, it would lathe in the wrong place and would look completely different to the desired result. After using the lathe tool, I applied a bright colour to make it stand out.

Next, I had to create a light bulb to go inside the lamp shade. This was created using the exact same method as described above. This is an image showing the Adobe Illustrator drawing:

The image below shows the finished result after both shape have been created:


The next step was to add a raytrace material to the lightbulb to make it look transparent and more realistic so that light emitting from it can be refracted. The material used was slightly differently to the two cases mentioned above. The idea is to ensure that light is allowed through the bulb and is refracted. However, reflection had to be kept to a low because otherwise the light would reflect the colour of the lamp shade.

After rendering however, the lightbulb shone through the lampshade, even though the lampshade was set as opaque. This could have been because the type of light used was omni, therefore it was chanegd to a spotlight. 


The image below shows the light changed. This looks much better than the image above. However, The bulb is too far down so it was moved up.


The image below shows the final result, which is much more realistic:


Guildhall Shop: 

Cashier

The cashier was a vital part of the production of the Guildhall shop. It is mainly created of box primitives which have been converted to editable ploys and manipulated so that they form a more rounded and realistic shape. Buttons for the cashier were created by using the UVM Map modifier with a very flat box primitive. This is to make the buttons look more realstic, rather than using a completely flat, 2D plane.

Merchadise for sale

After getting into contact with the committee in Finchingfield, we discovered that they would be selling small gifts in the shop because they want to ensure that they are affordable for the children who visit on school trips. Items like pencils with the Guildhall logo, rubbers and notepads will be sold.

The image below shows the items in their most basic form. The rubbers and books are simply box primitive shapes. The pencils are slightly more complex though:


The pencils are slightly more complex though. They have been created from a cylinder which has been converted to an editable poly. The segments were increased so that the middle sections could be extracted out to form the top of the pencil. A cone was then created and inserted in the top of the cylinder shape and materials were added to produce the image below:


After a label was added by using the Guildhall logo and UVW Map, multiple copies were created a grouped to make them suitable for placing in the shop:


The image below shows all of the merchandise together after it has been rendered.


 -------------------------------------------------------------------------------------------------------------------
References

Blogspot
2011
Concrete for church pillars
Available online at: https://blogger.googleusercontent.com/img/b/R29vZ2xl/AVvXsEiJBeK59K-OJfRGmyYYHBnNhXN7teIFDDnawSnXLNJnyPixBKtzBruIbtKD6VMIx3jgyeGHlkjSFP0LBNCqDXI6M44XoCiCjHhv0WrDPxaJvOqYTdKg0pq9YjeOjQTmBjTLvYSw9685K6Dr/s400/concrete.jpg
Last Accessed: 19/12/2011

Daily Telegraph Online
2011
Available online at: http://www.telegraph.co.uk/travel/picturegalleries/6168481/Natural-History-Museums-Darwin-Centre-Sneak-peek.html?image=4
Last Accessed: 19/12/2011

Finchingfield Guildhall Trust
2011
Finchingfield Guildhall logo used on merchandise
Available online at: http://www.finchingfieldguildhall.org.uk/images/LogoWordsRedBarw624Shop.jpg
Last Accessed: 19/12/2011

Flickr
2011
Clock face for the front of the church tower
Available online at: http://farm3.static.flickr.com/2389/2492423217_af1252613e.jpg
Last Accessed: 19/12/2011

Fotolibra
2011
Stone texture for church walls 
Available online at: http://gb.fotolibra.com/images/previews/642620-stone-texture-014.jpeg
Last Accessed: 19/12/2011

Public-Domain-Image
2011
Texture for red roofing to go on the back of the church building
Available online at: http://www.public-domain-image.com/public-domain-images-pictures-free-stock-photos/objects-public-domain-images-pictures/red-roofing-tiles.jpg
Last Accessed: 19/12/2011

Wall Sticker Outlet
2011
The sandy wood colour used for the pencil texture
Available online at: http://www.wallstickeroutlet.com/Images/york-lt-tan-wood-texture-2.jpg
Last Accessed: 19/12/2011

Components Made For The Library

I created all of the objects which are found in the library area and in this post, I will describe how each of them were made and describe any of the techniques used in order to make them. 
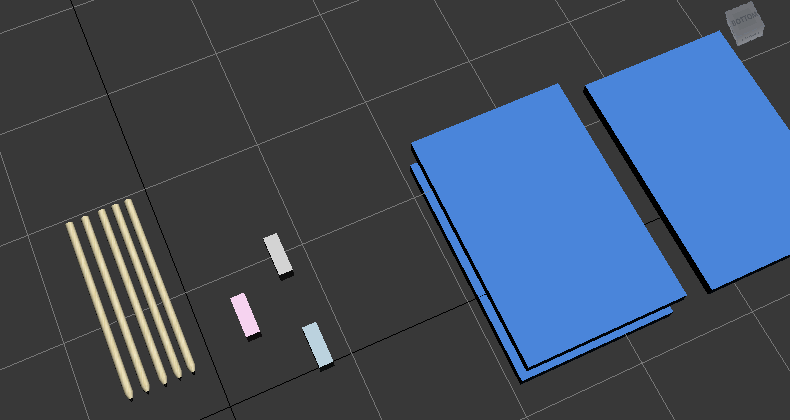
Bookcase

The bookcase was made of primitive box shapes which were adjusted so that the "books" to go in the shelf will be slightly overlapping. The image below shows this: 


Materials were then added to the boxes to make them look more realistic. A bump texture modifier was applied to make the wood look more lifelike. I also increased the shine to make it look more realistic under different lighting conditions. Also the actual shelves cannot be animated themselves, we intend to show a character interacting with the bookcase and "reading" a book item from it. This is intended to give the person viewing the short clip an idea on what the library can be used for.


Photocopier 

The photocopier was constructed out of box primatives with materials placed on top of them. UVW Map modifier was used to ensure that the touch-screen user interface is positioned correctly on the object. 

In order to animate the photocopier, the drawers could be moved in and out and the pivot point can be modified on the scan lid so that it opens and shuts. A silhouette could be seen utilising the photocopier and this could be vital because when one of our group members contacted the Guildhall committee, we were told that this will be the only photocopier in the village that the whole public can use.


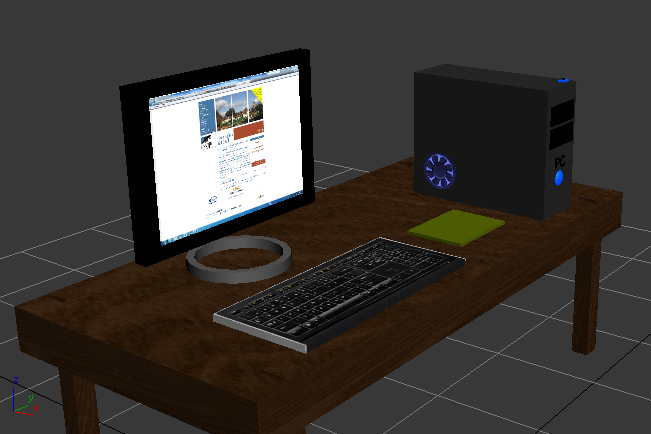
Computer Desk With Components

The computer desk was made in a similar kind of fashion to the bookcase. Again, primitive box objects were created an arranged so make it look like a table:


Materials were added with a bump texture and shine effect to make it look more realstic. One of the good points about creating the desk in this way is that the legs can be shortened so it can be used as a coffee table for the library and any of the other rooms that may require one. It can also be adapted as a normal regular table by increasing the size of the tabletop.


The image below shows the desk with all of the computer components on it. All of the computer parts are comprised of shapes. If the textures did not fit on them correctly, I used UVW map to rotate and move the textures into position. The button on the computer lights up and the computer fan is animated so that it rotates. The plan is to display a character using one example of the computer within the library to demonstrate how a person would work in the library.


However, a computer desk is not complete without a computer chair:

Computer Chair

Firstly, I created a cylinder and converted it to an editable poly. This allowed me to select the polygons or vertices I want to delete in order to make the back of the chair. The image below shows this:

Next, I created a copy of the chair back and rotated it. In order to gain a more lifelike shape, I added a slight rotate to the back of the chair and increased the height slightly.

The next step was to create the base of the chair. Identical cylinders were created and converted to editable polys. This allowed me to adjust the shape so make them look more like the base of a swivel office chair.


Next, I created the wheels and added a covering over the top, again by selecting the polygons I did not want and deleting them.

The following image shows the base of the chair with the wheels attached to it. All that had to be added was a couple of tubes to recreate the stand which connects the base to the chair seat and a primitive box to secure both the seat and the back of the seat together.


Here is the chair in its finished form after materials were added to it. In order to animate it, the actual seat can be swivelled like in real life and the wheels can rotate so it can move backwards and forwards.  However, we intend on using silhouettes to demonstrate how the Guildhall is used so a silhouette will be positioned on it using the computer. Perhaps, to make it look even more realistic, I could animatethe silhouette sitting down on the chair and pulling it up towards the desk.


Here is the finished article:

Fireplace

Two of the key features to the library in the Guildhall are the two fireplaces which form the centrepieces to the room. The basic shape was created using primitive box shapes alligned:
Again, textured bumps were used to make the stone surface of the fireplace look more authentic. The image below shows how this was done:


As you can see from the image below, the texture on the fireplace was not alligned correctly and the stoens have been stretched out across the box shapes, making them look unsightly.


UVW map modifier was used in order to correct this:


In order to create the fire, I used particles which I have never used before so I gained a new skill. My first attempt did not work as planned because the fire was too big and it did not look as realistic because there were no logs. However, after making some adjustments and adding some logs (see image below) The fire looked much more realstic.


The video below shows the fire in action:


A chimney breast will also need to be constructed because the new plan is to have the chimneys outside puffing out smoke. In order to keep the building as lifelike and realistic as possible, this is an object which will needed to be added before the final render.

Armchair

Armchairs can be used in more places in the Guildhall however they are primarily based in the Library next to the fire. The basic shape was created with box primitive shapes. I then used the Chamfer Tool which I have not used before, to add more polygons on the chair arms to make them look more rounded and give a better effect when the shapes are smoothed.


The image below shows the chair TurboSmoothed. After applying the modifier, it became apparent that the back of the chair was not wide enough and looked a bit perculiar. Therefore, I adjusted the back of the chair.


The image below shows the finished chair shape. No material has been added because depending on what room the chair is placed in, the material could be different.


--------------------------------------------------------------------------------------------------------------------
References

123rf.com
2011
Oak bark for logs in fireplace
Available online at: http://us.123rf.com/400wm/400/400/llepet/llepet0907/llepet090700099/5191848-oak-bark-texture-material-background-decoration.jpg
Last Accessed: 23/11/2011

DeviantArt
2011
Material texture for the office chair
Available online at: http://fc02.deviantart.net/fs32/i/2008/225/f/c/Carpet_TEXTURE_by_she_sinsstock.jpg
Last Accessed: 23/11/2011

DeviantArt
2011
Library book texture for bookcase

Available online at: http://fc07.deviantart.net/fs71/i/2010/241/6/7/books_texture_by_lestatis-d2xit4k.jpg
Last Accessed: 23/11/2011

Facebook
2011
Duck image for the mouse mat

Available online at: https://www.facebook.com/photo.php?fbid=10150345712043381&set=pu.273096853380&type=1&theater
Last Accessed: 23/11/2011

Glenview Doors, Inc.
2011
Wood texture for bookcase and computer desk
Available online at: http://www.glenviewdoors.com/PRODUCT-DETAILS/WoodSamples/PopUp-600x350/Ash-Dark.jpg
Last Updated: 04/09/2011
Last Accessed: 23/11/2011

Iconshock by Unusual Minds
2011
Texture for computer fan
Available online at: http://www.iconshock.com/img_jpg/BETA/computer_gadgets/jpg/128/cpu_fan_icon.jpg
Last Updated: 19/06/2008
Last Accessed: 23/11/2011

Logitech
2011
Keyboard texture
Available online at: http://www.logitech.com/repository/1170/jpg/9726.1.0.jpg
Last Updated: 19/06/2008
Last Accessed: 23/11/2011

Love Textures
2011 
Stone texture for the fireplace
Available online at: http://www.lovetextures.com/wp-content/uploads/2010/may/textures-large-6.jpg
Last Updated: 27/10/2011
Last Accessed: 23/11/2011

Thursday 17 November 2011

Components Made For The Kitchen

Oven/Cooker

The first component that I made for the kitchen was a cooker. It was fairly straightforward to make. Firstly, I made a cube and added four small cylinders to the top of it. The door was made up of a smaller cube. The handle consists of two small cylinders and one larger cylinder. 


Next, I applied materials to the cooker to make it look more realistic using the Material Editor and the UVW Map modifier. The handle has been given a realistic metal effect.


The images below show the two materials that I made myself using a paint program. The rings have been placed on the cooker hobs and the clock/timer has been placed on the front of the cooker in the middle.
 

After applying the finer details, I added some buttons and dials to the cooker to make it look more lifelike. The final image shows the final rendered result. If it was to be animated, the door can opened and shut using the rotate tool. If one of the group members were to make a saucepan or a frying pan, food could be animated cooking.


Counter

One of the main components which can be used in various places in the Guildhall and not just the kitchen alone is a counter. The counter was simply made from three boxes with a granite and dark hardwood texture applied. In order to make the wood look more detailed, I used a bump modifier using the same image, set at 130%. The counter can be adapted to create cupboards and drawers.


Fridge

Another vital appliance for the kitchen was the fridge. Due to time constraints, I could only use a UVW Map with an image of a fridge on a box shape. This means that I would not be able to animate it and it would act as a static model instead. However, this is not necessarily a bad point because
it will act as a good model to create a kitchen atmosphere.


Mugs/Cups

Mugs and cups are good examples of "kitchen clutter" and can also be used at the Guildhall entrance for use with the tea set and the coffee machine. In order to make them, I created a teapot primitive shape, converted it to an editable poly and selected the polygons on the lid. These were then deleted:


 The spout of the teapot was also deleted:


This leaves a very simple cup shape:


Before I carried out any more edits to the shape, I added a material in order to make it look porcelain and more realistic. I ensured that the shine was quite high so that when the environment lighting falls on it, it shines without a reflection.


After using the TurboSmooth modifier, I extended the height of the cup to improve on the quality of the shape. The image below shows the final result:

Saucers/Plates

Saucers will be needed to go with the mugs/cups and plates will be needed in the kitchen to serve food on. These were very simply created by making a cylinder and increasing the number of cap segments. Using soft selection in vertex mode, I selected the middle vertex and moved it down. The brighter the red, the more effect the movement has on that particular vertex. This created an ideal method to create a plate "rim". The same porcelain material that was placed on the cups was placed on the saucers to ensure that they matched.


As you can see from the image below, the shape is still very basic and rough around the edges:


Therefore, I used the TurboSmooth modifier and this is what has provided the best saucer/plate looking shape.

Teapot

The teapot was created with the teapot primitive shape, was TurboSmoothed and had the porcelain material added to it.


 -------------------------------------------------------------------------------------------------------------------
References

Glenview Doors, Inc.
2011
Wood texture for counter
Available online at: http://www.glenviewdoors.com/PRODUCT-DETAILS/WoodSamples/PopUp-600x350/Ash-Dark.jpg
Last Updated: 04/09/2011
Last Accessed: 24/11/2011

John Lewis
2011
Freezer image
Available online at: http://s7v1.scene7.com/is/image/JohnLewis/231054811
Last Accessed: 24/11/2011

World Of Stock
2011
Granite counter worktop texture
Available online at: http://www.worldofstock.com/slides/BGT2449.jpg
Last Updated: 15/03/2009
Last Accessed: 24/11/2011